Lab Guide: Deploy and Configure FortiManager UMS on AWS
Quick Navigation
- Overview
- Lab Objectives
- Lab Topology
- Prerequisites
- Naming Convention
- Section 1: Log in to AWS
- Section 2: Deploying FortiManager in AWS
- Section 3: Create a FortiManager API Administrator
- Section 4: Create the AWS Cloud SDN Connector
- Section 5: Enable the SDN Connector for UMS
- Section 6: Creating a FortiFlex Connector
- Section 7: Create an Auto Onboarding Rule
- Section 8: Deploy the Cloud9 Terraform Workstation
- Section 9: Stage 1 — Deploy Infrastructure with Terraform
- Section 10: Configure FortiManager and Activate the ASG
- Section 11: Validate Auto Onboarding
- Section 12: Scaling the FortiGate Auto Scaling Group from FortiManager
- Section 13: Troubleshooting
- References
Overview
In this lab, you will configure FortiManager for AWS User Managed Scaling (UMS) integration by following the official Fortinet AWS Administration Guide.
Each student will use an individual AWS account. AWS access keys and secret access keys have already been created by the instructor.
The lab uses two Terraform stages in the same directory, backend and workspace:
| Section | Stage | Expected result |
|---|---|---|
| 9 | infrastructure | GWLB, networking, web-demo infrastructure and an empty ASG; zero FortiGates |
| 10, Steps 1–6 | Prepare FortiManager | Templates, populated policy package and onboarding rule ready using the deployed GWLB addresses |
| 10, Step 7 | active | Two FortiGates launch and receive configuration through onboarding |
| 11–12 | Validate and scale | Verify inspection, scale to three using UMS, then return to two |
Section 10, Step 8 covers manual installation for already registered devices. Existing running labs should remain active; switching to infrastructure requests scale-in to zero.
Lab Objectives
By the end of this lab, you will be able to:
- Log in to your assigned AWS account.
- Confirm your AWS identity and region.
- Deploy and access FortiManager.
- Create a FortiManager API administrator.
- Configure a FortiManager AWS Cloud SDN connector.
- Create an auto-onboarding rule.
- Configure a FortiFlex connector in FortiManager.
- Deploy infrastructure first, then activate the FortiGate ASG after FortiManager is ready.
- Validate that FortiManager can discover AWS Auto Scaling resources.
- Install GENEVE, routing, syslog and the demo policy package through FortiManager.
- Test the public HTTP web demo and identify actual inspection traffic.
- Scale from two to three FortiGates through UMS, then return to two.
Lab Topology
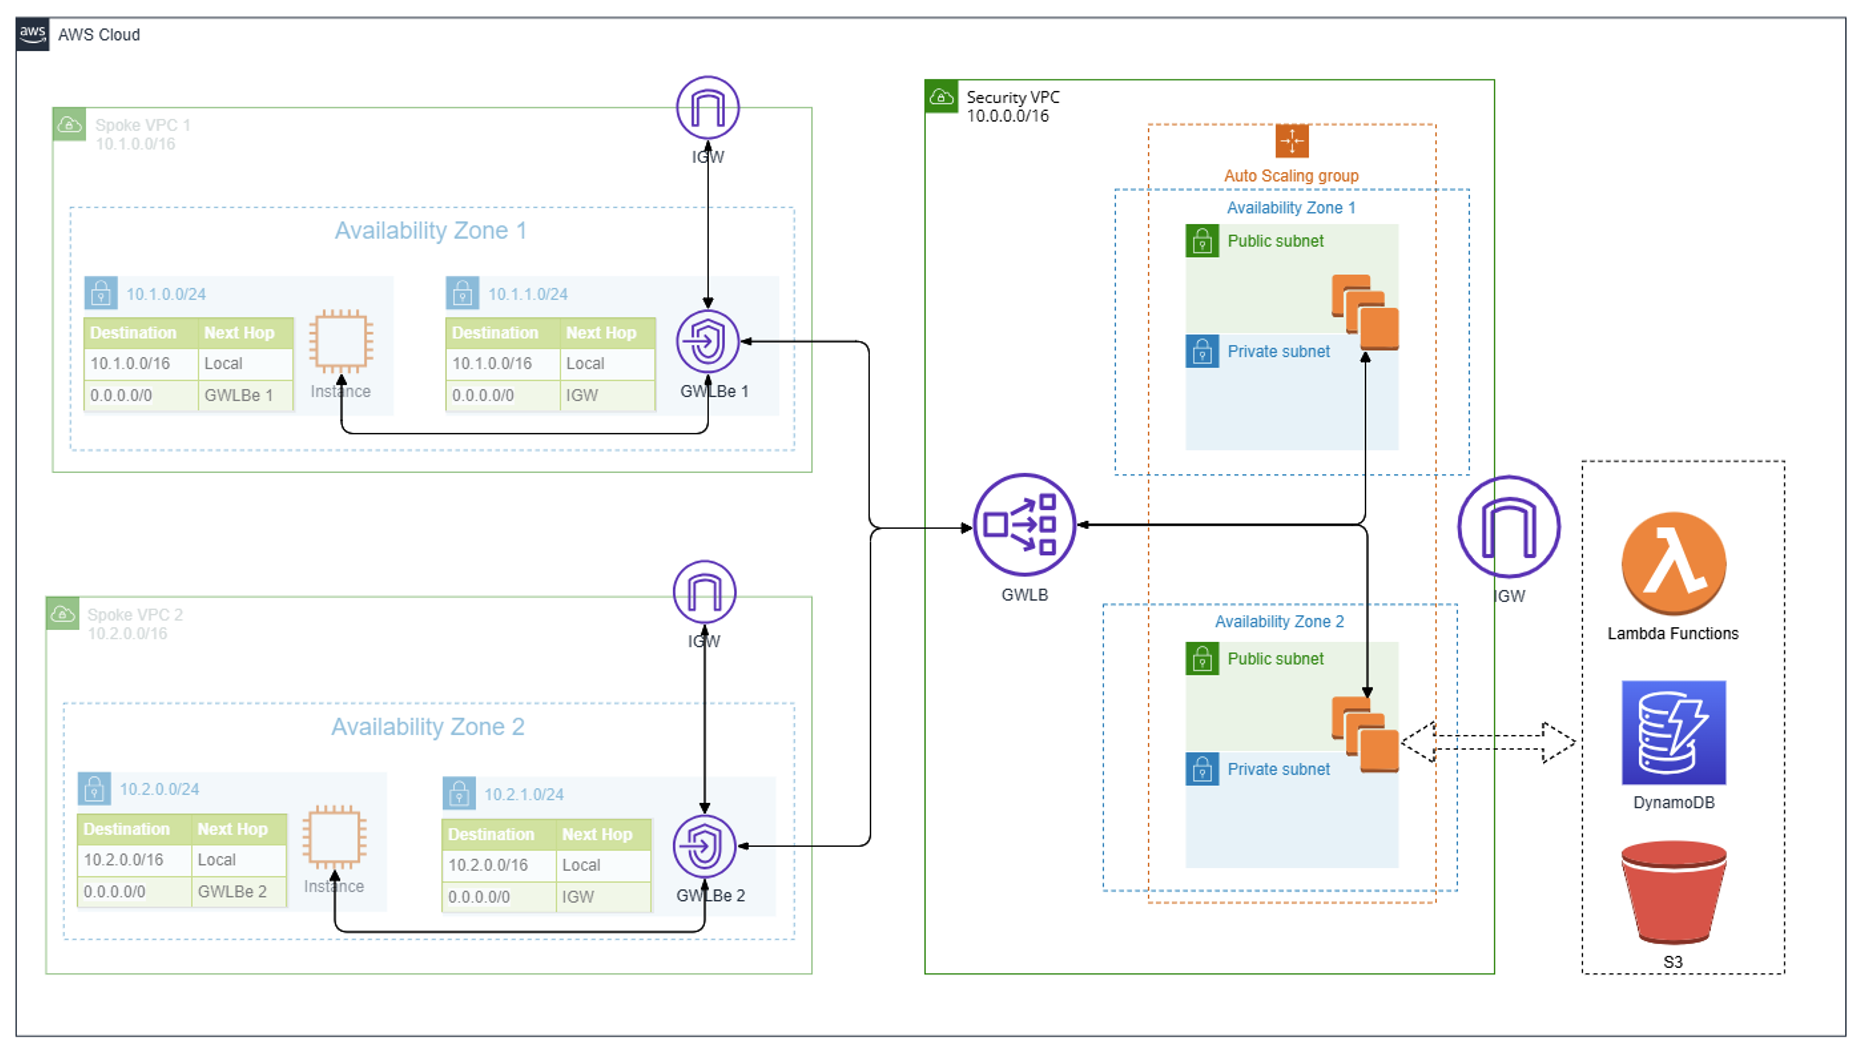
The image shows the general multi-spoke GWLB architecture. Its 10.1.0.0/16 and 10.2.0.0/16 spokes are reference examples, not the web-demo addresses used in this lab. The deployed demo uses a separate 10.50.0.0/16 spoke: HTTP server 10.50.0.10, private syslog collector 10.50.0.11. The collector and HTTP service share one EC2 instance with two private addresses. FortiManager and the Terraform workstation are deployed separately and are not shown. Section 10 shows the lab's inspected HTTP and private telemetry paths.
Prerequisites
Before starting, confirm that you have received the following from your instructor:
| Item | Example / Notes |
|---|---|
| Credential portal URL | Provided by instructor |
| Student ID | Example: student01 |
| Lab access key | Provided by instructor |
| AWS Console URL | https://console.aws.amazon.com/ |
| AWS account ID | Provided by instructor |
| AWS IAM username | Provided by instructor |
| AWS password | Provided by instructor |
| AWS access key ID | Provided by instructor |
| AWS secret access key | Provided by instructor |
| AWS region | eu-central-1 |
| FortiManager URL | Obtained after deployment in Section 2 |
| FortiFlex token ID | Provided by instructor |
| FortiCloud API user & password | Provided by instructor |
Credential portal
If your instructor provides a credential portal URL, open it and enter the shared lab access key and your assigned Student ID. The portal returns the AWS, FortiCloud, and FortiFlex values used throughout this lab.
Important
Do not share your AWS access key, secret access key, FortiManager password, API key, or license files with other students.
Naming Convention
Use the following naming convention throughout the lab:
student<number>Example:
student01-FortiManager
student01-FMG-API-admin
student01-AWS-SDN-Connector
student01-Onboarding-Rule
student01-Fortiflex-Connector
Replace <number> with your assigned student number.
Start the Lab
Start with: